



How To Achieve Smooth, Sleek Hair At Home
Everything you need to know to smooth your hair like a Pro Stylist - no salon visit required!
Want to know how to straighten hair at home? Or how to smooth frizzy hair and get that glossy, glass-like finish? You’re in the right place. With the right hair straightener (or flat iron, as some like to call it), and a few simple techniques, sleek hair is easier (and faster) to achieve than you might think.
There’s just something about a smooth, straight hairstyle that feels polished, powerful, and confidence-boosting. Whether you're learning how to straighten your hair for the first time or looking for tips to get frizz-free results, this beginner’s guide has you covered.
We’ll show you:
- How to choose the best heat setting for your hair type
- How to section your hair for even, smooth results
- How to straighten hair step-by-step for maximum shine and minimal damage
Let’s break it down, step by step, so you can enjoy flawless, immaculate hair every single day....

1. Prep Your Tresses and Section Like a Stylist Would
- Always ensure your hair is prepped correctly:
- Start with clean, dry hair. Before using any heat tools, make sure your hair is free from excess oils and product buildup. Wash and condition your hair with products tailored to your hair type, and gently towel-dry it before moving on to blow-drying or air-drying your hair. Shop our Hair Dryers.
- Brush or comb hair to ensure it’s completely tangle-free
- Before you even think about heat styling, spritz on a heat protectant spray or serum. This creates a protective barrier that shields your strands from heat damage, ensuring your hair stays healthy and sleek throughout your styling session, so don’t skip it.
- Always start by sectioning your hair into 3x key sections - top, middle, and bottom
- Once you've defined your 3x key sections, break down your hair into smaller sections, approx. 2cm to 5cm wide sections (depending on your hair type and the size of your straightener plates - for slimmer-plate straighteners, use smaller sections, and for wider-plate straighteners, use larger sections) for the most even, controlled straightening. Too big sections and you’ll miss spots; too small sections and you’ll be there forever.
- If you find your styles at home never look as good as when your hairdresser does them, it’s more often than not down to your sectioning skills. If you missed it, check out this easy-to-follow guide: How to Section Hair the Right Way
2. Choose the Correct Heat for Your Hair
Why? Because one heat does NOT work for all. The key to creating effective and long-lasting styles is understanding your natural hair type. But why is knowing your hair type important? Well:
- Hair type is all about knowing your hair’s curl pattern
- Your hair type is determined by genetics
- There are 4 different hair types - you may have different curl patterns on different parts of your head
- Your curl pattern can alter with heat, chemicals, hormones, and medications (somewhat), but the basic curl pattern is in your DNA
- Different hair types require different styling temperatures. Use this guide to understand your hair type:
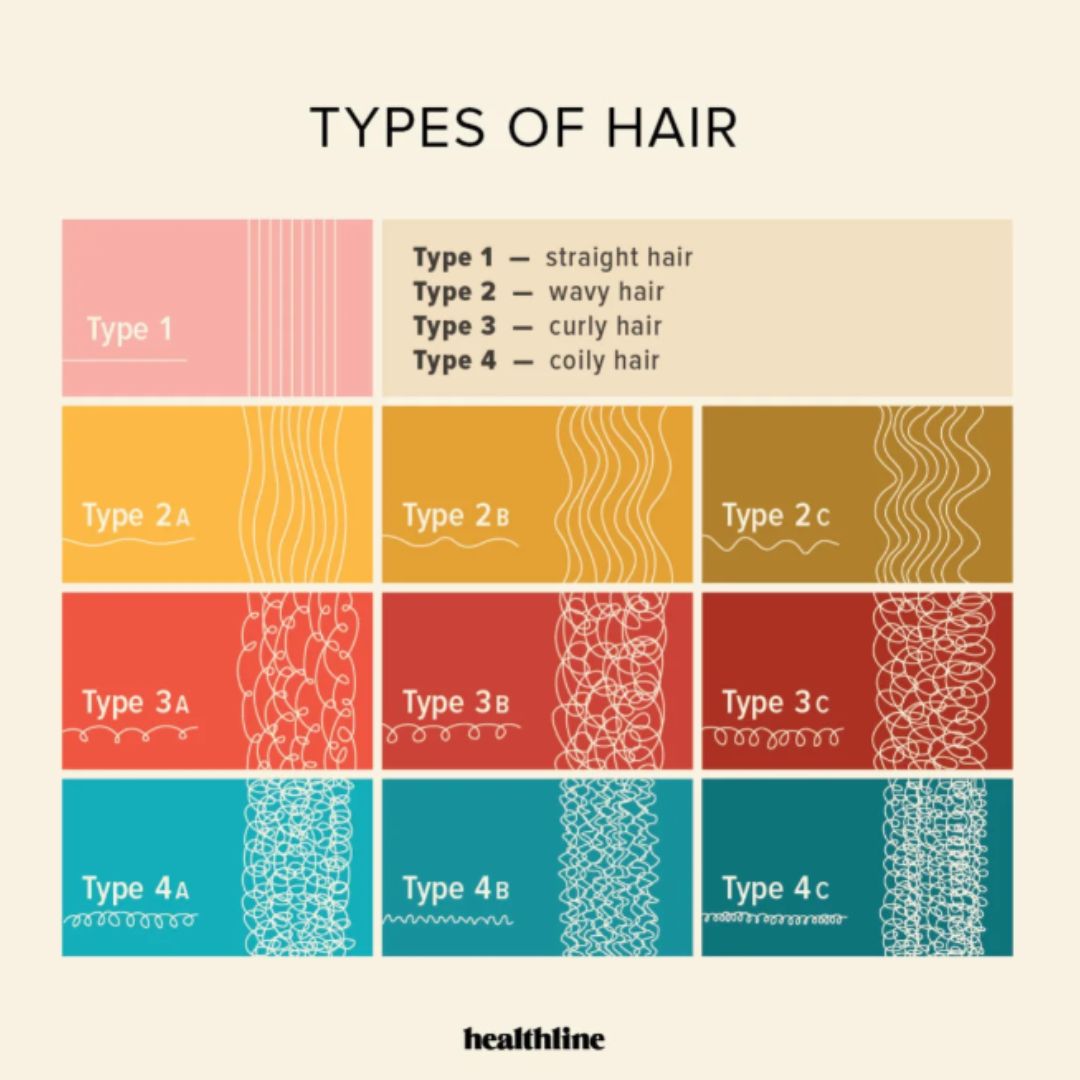
Source: Healthline
Quick Cheat Sheet: Match Your Hair Type to the Ideal Temperature
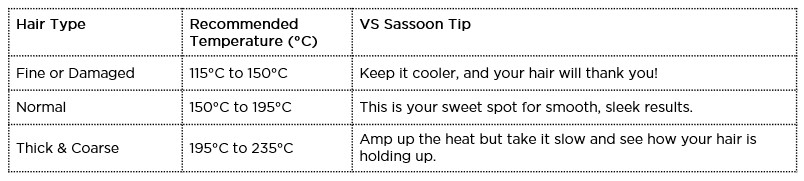
TOP TIP: Start styling on a low heat setting and only turn it up if needed. Too much heat can lead to dryness and breakage, so aim for the lowest setting that delivers the results you want while keeping your hair healthy. Consistently using excessive heat can weaken hair and cause long-term damage, so it's essential to find the right balance for your specific needs.
3. Patience Makes Perfect
Start at the top of each hair section, gliding down s-l-o-w-l-y and p-a-t-i-e-n-t-l-y.
4. Don’t Go Over and Over the Same Section
One pass per section, max two if you really need it. Repeatedly clamping and gliding over the same hair section is just asking for split ends and breakage. Side effects none of us want!
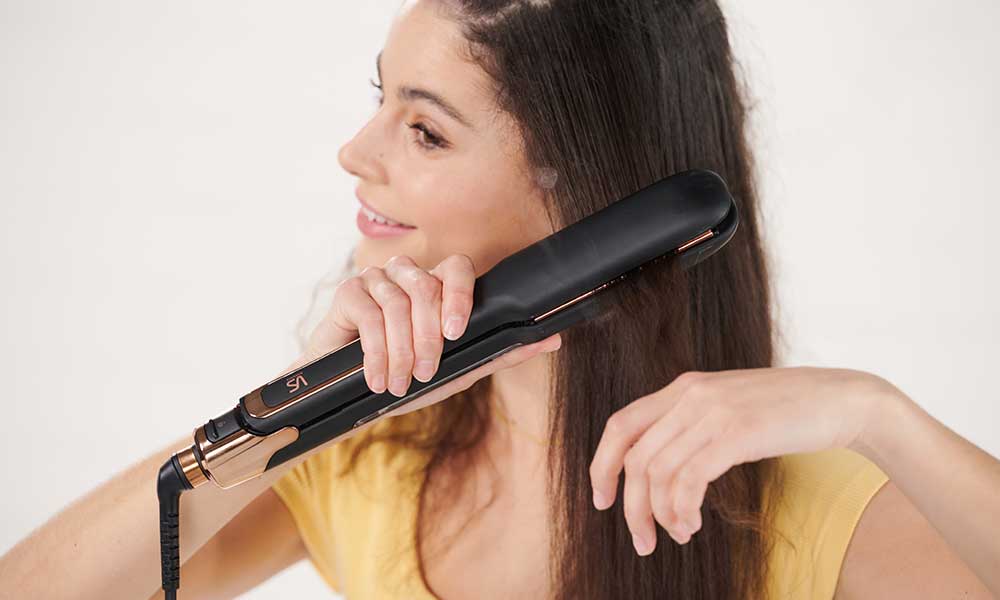
5. Finish With Shine & Lock In Your Style
When you’re done, run a tiny bit of shine serum or hair oil through the mid-lengths and ends. This locks in your sleek at-home hair finish and keeps frizz in check. Sleep on a silk or satin pillowcase to keep your style smooth overnight.
Pro Straightening Tips:
How to Make Frizzy Hair Smooth at Home: Your Anti-Frizz Hair Routine
- Use a microfiber towel or a cotton T-shirt to dry your hair. Regular towels can rough up the cuticle and cause frizz.
- Always use a heat protectant and avoid high heat if your hair is prone to frizz.
- Sleep on a silk or satin pillowcase to keep your sleek hairstyle intact and minimise overnight frizz.
- Add a lightweight anti-frizz serum or cream to your routine for extra smoothness.
Straightening Long Hair: Tips for the Ultimate Sleekness
- Work in smaller sections about 2cm to 3cm wide for even heat and thorough straightening. This allows the straightener to tend to every strand for ultimate results.
- Take it slow. Long strands need extra TLC, so glide the straightener at a steady pace so the heat has time to do its thing.
- A straightening brush can be a game-changer for quick, smooth results on long hair.
Short Hair Styling & Touch-Ups of Ends
- Focus on the ends for touch-ups. Don’t overdo the roots, or your hair can end up looking greasy and flat.
- Use a lower heat setting since short hair is usually more delicate.
- For a natural finish, try holding your straightener vertically when styling short sections or ends. You’ll get a softer, more natural finish with a little movement.
Get Creative With Your Styling Tools
Straighteners aren’t the only way to get a sleek hair look; there are more great tools out there:
- Hot Air Stylers: Dry, style, and smooth all at once, and are perfect for quick, frizz-free mornings.
- Curling Wands: Not just for curls! Use them to add a soft wave to your sleek style.
- Heated Brushes: Tame frizz and add volume or polish, especially on day-old hair.
- Petite options: Game-changers for short hair, fringes, or styling those tricky bits around your face.
Sleek Hair at Home: Quick Recap
- Prep with the right tools and heat protectant
- Always section hair correctly
- Choose the correct heat for your hair type (see chart!)
- Take your time
- Don’t go over the same section a million times
- Finish with shine serum and anti-frizz products
- Sleep on silk or satin for next-level smoothness
- Get creative with your styling tools to switch up your look
Straightening Do’s and Don’ts:
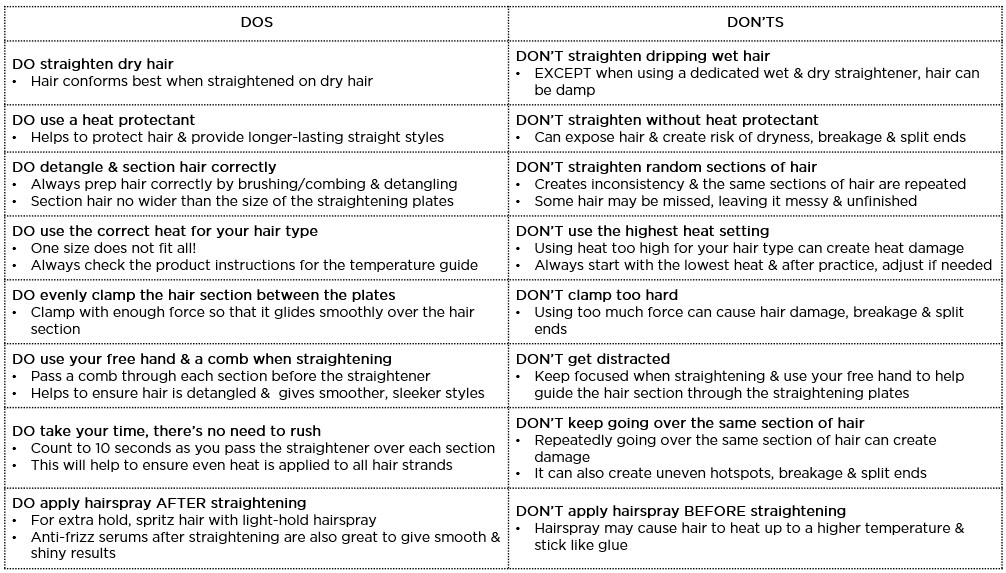
The VS Sassoon range has your back, whatever your hair type or length. By selecting the right straightening tool, preparing your hair properly, using a heat protectant, and adopting the correct techniques, you can create a salon-worthy look from the comfort of your own home.
Ready for next-level polish and sheen? Explore our range to find all the easy-to-use tools you need to achieve a glass-like shine at home. Plus, learn all the sciency stuff about our frizz-fighting Ceramic versus Ionic Technology here.
Now go out there and face the day with impeccable style and unstoppable sheen!
Love your style, the VS Sassoon team, xo